Choosing Images from the Stock Library
Pick a professional food photo from Lekro's built-in library when you don't have your own shot of a dish.
Dashboard and mobile app
A menu of empty photo slots makes a good kitchen look unfinished. The Stock Library fills those gaps with professional food photography you can drop onto a dish or a category in two clicks.
Where to find it
On neither platform is the library a page of its own. It opens from wherever a photo already belongs: a dish, or a category cover.
In the dashboard
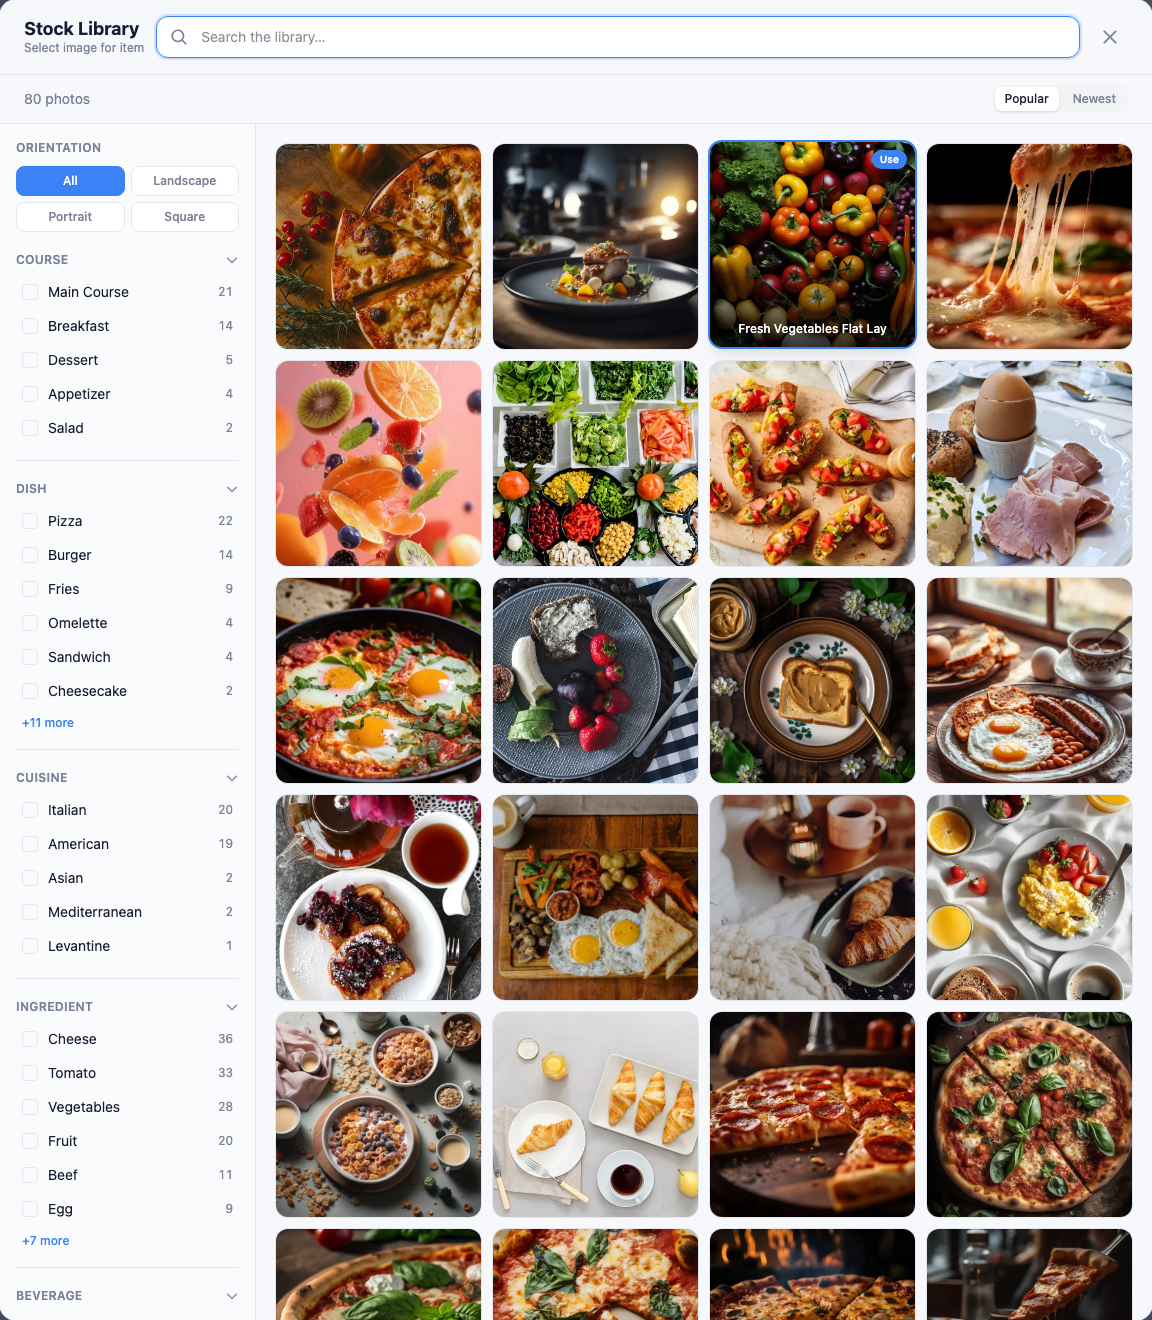
Open a dish from Menu, look at the photo area at the top of the editor, and click Stock Library next to the upload option.
The picker opens on top of the item editor, which stays open behind it.
On the mobile app
Open the Lekro app and go to the Menu tab. There are two ways to the same sheet:
- Tap the small camera badge on a dish’s thumbnail in the list.
- Or open the dish, then tap its photo at the top of the edit sheet. For a category cover, open the category’s edit sheet and tap the cover the same way.
Either route slides up a sheet titled Update Image, with the dish’s current photo beside the title. Two rows sit inside it: Upload a photo, which offers to take one from your phone, and Stock Images, which offers free food photography. Remove photo sits under them in red, and only when there is a photo to remove. Tap Stock Images.
Warning: Opening Update Image from inside an edit sheet closes that sheet, and anything you typed but hadn’t saved closes with it. Save your text changes first, or set the photo before you start typing.
Narrowing it down
The library is large enough that scrolling isn’t a strategy. Search, filters and sort are on both platforms and they search the same catalogue, but a phone has no room for a filter rail and no hover, so the controls are arranged differently and one photo tap does something quite different.
In the dashboard
Three tools cut the library down:
- Search by name: “burger”, “latte”, “salad”, and the grid filters as you type.
- Filters on the left. Each tag group shows a count, so you know how many photos match before you commit to a filter.
- Sort by Popular or Newest. Popular surfaces what other restaurants reach for most.
Active filters appear as removable chips, and Clear all resets them. Hover a photo and a Use badge appears; click it to drop that image into the slot and return to the editor.
Note: Choosing a photo fills the slot but doesn’t save the dish. If you close the editor without saving, the picture is lost with the rest of your edits.
On the mobile app
The Stock Images sheet keeps two controls above the grid and puts the rest behind one of them:
- Search images… at the top. The grid catches up a moment after you stop typing, not on every keystroke.
- Filters on the left of the row below, with the photo count opposite it. A badge on the button counts how many filters are on.
Photos come two to a row with each one’s name underneath, and the next batch loads on its own as you scroll.
Tapping Filters swaps the sheet’s contents for a panel, and sort lives in there too, which is where the app parts company with the dashboard. Sort is the first group, a Popular and Newest pair, then Orientation, then a section per tag group that you can fold shut. Each tag is a checkbox with its own count, and a group longer than six tags shows the first six with a +1 more link under them, counting whatever is left.
The panel’s two buttons are pinned to its bottom edge, which puts them below the screen at the height the sheet opens at. Drag it up to full height to reach them. Clear all empties every filter and leaves you in the panel, and stays greyed out until there is something to clear. Show 222 photos applies what you picked and closes the panel, and its number moves as you tick tags, so it tells you the size of the result before you commit to it.
What you picked then sits under the search bar as removable chips with a Clear all beside them. Once anything is on, a Reset appears in the sheet’s header, and that one clears the search as well.
Tap a photo to use it. There is no hover and no Use badge, and this is the one place the app does more than the dashboard does:
Note: On the app, the photo is saved the moment you tap it. Both sheets close, the dish updates in the list behind them, and there is nothing left to save. This is the opposite of the dashboard, where the picture waits with the rest of your edits.
Set orientation before anything else
Orientation is the filter worth setting first, because it decides whether the photo sits well or gets awkwardly cropped:
- Square suits item cards.
- Landscape suits category covers, which render wide.
- Portrait rarely fits either well.
Matching orientation to the slot up front saves re-picking later. It’s the first thing in the filter rail on the dashboard, and on the app it’s the second group in the filter panel, directly under Sort. Either way it costs nothing to set before you start looking.
Filling many dishes at once
Placing photos one at a time is fine for a short menu. For a long one, Auto-Fill Images matches a stock photo to every dish that’s missing one in a single pass.