Managing Orders
Run the live order queue — accept, prepare, and complete orders placed through your menu.
Managing Orders
Taking orders by hand works until it doesn’t. Misheard items, forgotten modifications, illegible tickets — small slips that add up to wasted food and slower turns. When customers order straight from your menu, what the kitchen sees is exactly what the guest asked for, and every order lands in one live queue you work through from start to finish.
The Live Queue
Go to Operations → Incoming Orders. This is your command centre — every active order, newest first, updating in real time as new ones arrive and the kitchen moves them along.
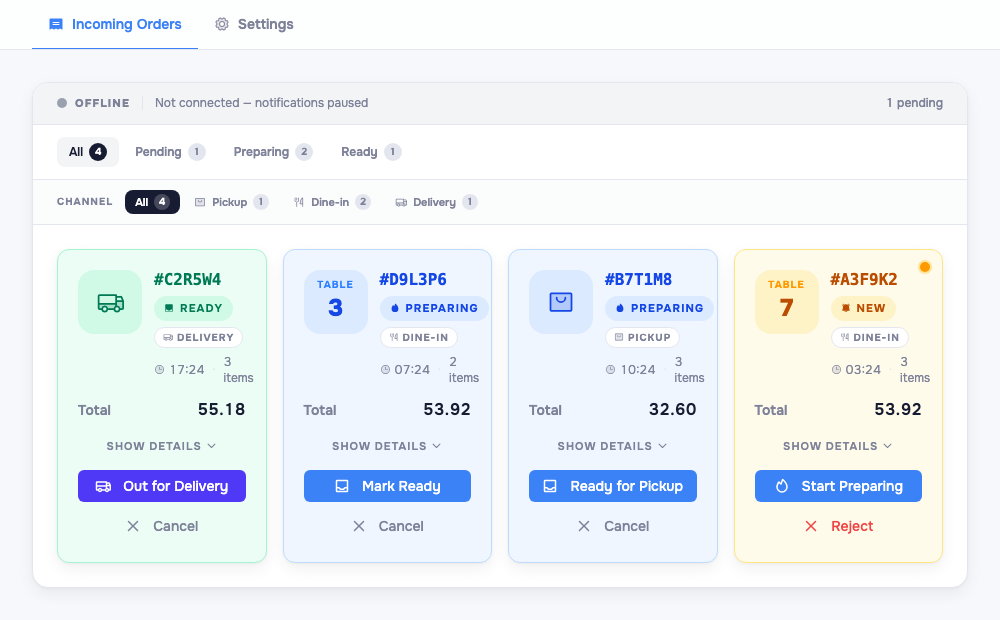
The banner across the top shows whether the page is Live — connected and listening for new orders in real time. New orders also trigger a notification so your team knows the moment one comes in. Each card carries a short order code, a status badge, a channel tag, the total, and a timer counting how long it’s been open. Switch between grid and list with the view toggle, and hit Show details on any card to see the items, customer contact, and the price breakdown.
Filtering the Queue
Two rows of filters keep things focused when it’s busy:
- Status tabs — All, Pending, Preparing, Ready (and Out for Delivery when relevant), each with a live count.
- Channel filter — narrow to Dine-in, Pickup, or Delivery. This row only appears when you’re actually taking more than one channel, so single-channel restaurants never see the clutter.
Working an Order
Every order moves through the same simple flow, and each card always shows the one button that comes next:
- New comes in → tap Start Preparing to send it to the kitchen.
- Preparing → tap Mark Ready once it’s plated.
- Ready → tap Mark Served (dine-in) or Ready for Pickup for collection.
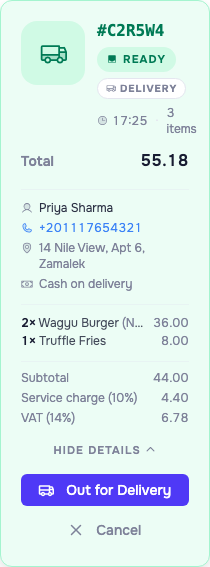
Delivery orders get one extra step: from Ready you tap Out for Delivery, then Mark Delivered once it lands. Pickup and delivery cards also show the customer’s name, phone, and address so your team can call or hand off without digging.
Need to turn one down? Reject declines a brand-new order; Cancel stops one already in progress. If the order was paid online (look for the green Paid pill), rejecting it refunds the customer automatically — so the dashboard asks you to confirm first.
A Word on Channels & Settings
Which channels you accept — dine-in, pickup, delivery — plus service charges, VAT, and delivery zones all live under the Settings tab at the top of this same page. If a channel isn’t switched on there, orders for it simply won’t reach this queue.
Tip: Keep this page open on a tablet in the kitchen or at the pass during service. The live timer on each card makes it obvious at a glance which orders have been waiting longest.
Good Habits
- Acknowledge fast. Tapping Start Preparing quickly tells the customer their order was received — silence makes people anxious.
- Keep statuses honest. The status a guest sees on their phone mirrors what you set here, so only mark Ready when it truly is.
- Watch the timers. A card sitting too long in one status is your cue to check in before it becomes a complaint.
Run the queue well and online ordering quietly does what good service always did — gets the right food to the right person, faster.