
Creating an Additional Restaurant
Run more than one restaurant or branch from a single Lekro account, and switch between them in a click.
Creating an Additional Restaurant
A single Lekro account isn’t limited to one restaurant. You can run a second branch, a sister brand, or a seasonal pop-up from the same login, and each one is completely its own workspace — its own menu, website, branding, orders, and analytics. You sign in once and move between them without ever logging out.
This walks through adding a new one, then switching between the restaurants you already have.
Open the Restaurant Switcher
It all starts from the restaurant switcher. Click your profile avatar in the top-right corner to open the account menu; the switcher sits right at the top of it. Click to expand it, and you’ll see every restaurant you own listed out.
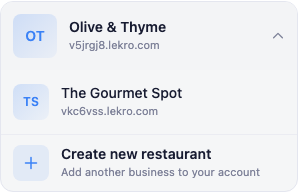
The Create new restaurant button is at the bottom of that list. Click it.
Name It
The screen you land on asks for one thing only: a name.
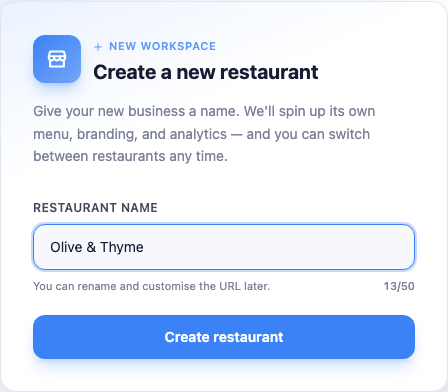
Type it — up to 50 characters — and click Create restaurant. There’s no pressure to get it perfect here. You can rename the restaurant and give it a custom web address afterwards, so a working name is enough to get going.
One thing can stop you: your plan caps how many restaurants an account can hold. If you’re already at that number, you’ll see a message where the form would be, and the way forward is either to upgrade or to remove a restaurant you’ve finished with.
Finish the Setup
The moment the restaurant exists, Lekro hands you straight to the three-step setup wizard — the same one you used for your first restaurant. You’ll give this one its identity, its regional settings, and its website features, then wrap up. If you want a reminder of what each step covers, Setting Up Your Restaurant goes through them in detail.
Switching Between Restaurants
Once there’s more than one restaurant on the account, the switcher becomes the place you live in — it’s how you move from one to another. You open it the same way, through the profile avatar, and clicking any restaurant in the list makes it the active one.
Everything reloads into that restaurant: menu, website, orders, settings, all of it. Each one’s data stays walled off from the others, so there’s no chance of a menu or an order from one branch bleeding into another.
If you’re ever unsure which one you’re working in, the name and logo in the top-right corner always tell you. It’s worth a glance before you start changing things when you’re juggling a few.