Translating Your Menu
Add languages to your menu, translate dishes one by one or the whole menu at once, and understand what bulk translation does and doesn't cover.
Dashboard and mobile app
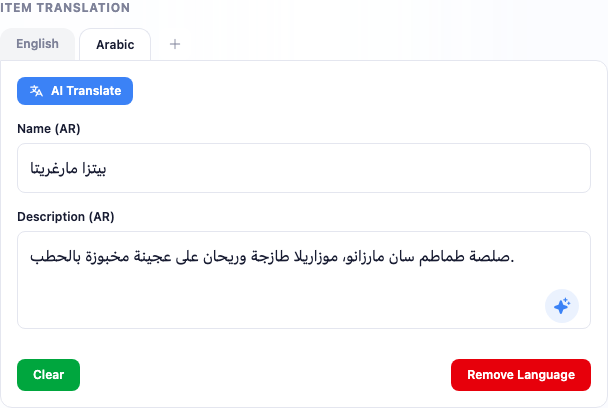
Lekro stores customer-facing text once per language, so “Margherita Pizza” and “بيتزا مارغريتا” are the same dish shown to different people. Category names, item names and descriptions, and modifier titles and choices can all hold a value per language.
Visitors get the language matching their browser, with a toggle in your site header to switch. Arabic flips the whole layout to right-to-left.
Add the languages first
Translation fields don’t appear anywhere until the language exists on your restaurant. That’s a settings job on both platforms. There’s also a shortcut on the language tabs inside any editor, which is the one you’ll want when you’re already deep in a dish and the language you need isn’t there.
In the dashboard
Go to Settings → Business Profile → Regional and find the Website Languages card.
- Add puts a new language on the restaurant.
- The star sets your default: the language you write in first, and the fallback shown when a translation is missing.
- The trash icon removes a language. You can’t remove the default one.
On the mobile app
Open the Lekro app on the Dashboard tab. The restaurant card at the top carries three buttons, and the middle one is an unlabelled gear.
Tapping it opens Account Overview. Scroll to Operations and tap Regional Settings. Languages sit at the top of that screen, under Supported Languages.
- Add Language, at the foot of the list, opens the picker.
- The star on a row sets your default. That row also carries a Default badge, and its star is filled rather than outlined.
- The trash icon removes a language. It is absent from the default row, so there is nothing to tap by mistake.
- A line under the list counts your languages against the plan: 2 of 2 languages used. At the cap, which is what the screenshot shows, Add Language is replaced by a padlock and a note to upgrade.
This screen is a form, not a set of switches. Add a language, leave without tapping Save Changes at the bottom, and nothing happened. That same button also commits your currency, timezone, VAT and service charge, which share the screen.
Translating one dish at a time
Open any category, item, or modifier group and its editor carries a translation block with a tab per language. Write the default language first, then switch tabs.
The tabs work the same way on both platforms. The first is your restaurant’s default and holds the source text; the rest hold translations. A + at the end of the row adds a language to the restaurant without a trip to settings, and that addition takes effect the moment you pick it. The words you type don’t: those wait for you to save the dish.
The auto-translate button appears on every tab except the default one, and it does more than fill the tab you’re looking at. It opens a dialog where you choose the source language and tick the languages to fill, so a single run can cover all of them. Review before saving. It’s a first draft, not a final answer.
In the dashboard
Open a dish in the menu editor and scroll to ITEM TRANSLATION, or CATEGORY TRANSLATION on a category. The tabs are named plainly: English, Arabic.
Switch to a language tab and click AI Translate. The dialog shows Source: with your default language beside it, a Target Languages list with a Select All shortcut, and a button that counts your picks: Translate 2 Items. Fields on a translation tab are labelled by language code, Name (AR) and Description (AR).
Clear and Remove Language sit at the foot of the block and are wildly different decisions. Clear empties this dish in the tab you’re on. Remove Language takes the language off the entire restaurant: Remove AR? All translations for this language will be deleted.
On the mobile app
Open the Lekro app, tap Menu in the bottom bar, and tap a dish. The block is headed ITEM DETAILS, or CATEGORY DETAILS on a category. Its first tab reads Default (English), named for your restaurant’s default rather than the language the app itself is running in.
On the default tab you get Default Language (Source) in italics where the buttons would be. Switch to any other tab and three things arrive at once: Auto Translate, fields relabelled by language name rather than code (Name (Arabic), Description (Arabic)), and Clear and Remove Language at the bottom.
Auto Translate opens a picker rather than filling the tab you’re on.
Translating from shows your default language on a badge; tap the swap icon to translate out of something else instead. Translate stays greyed out until you tick at least one target, and once you do it counts them: Translate (1).
Read those two bottom buttons before you tap either. Clear empties this dish. Remove Language removes the language from the restaurant, and the alert asks with the language code rather than its name: Are you sure you want to remove AR? This will hide it from all items.
Modifier groups have no other route. Bulk translation skips them, so their titles and choice names are always a manual visit. The block there is narrower too: you can translate the display title and each choice name, but prices and the list of choices belong to the default tab and are shared across every language. In the app it’s narrower still, and its Auto Translate fills only the tab you’re on instead of offering a picker. Using modifiers walks through that editor screen by screen.
Translating the whole menu at once
One pass over the whole menu, in one direction, for whichever fields you tick. Both platforms have it, under different names.
In the dashboard
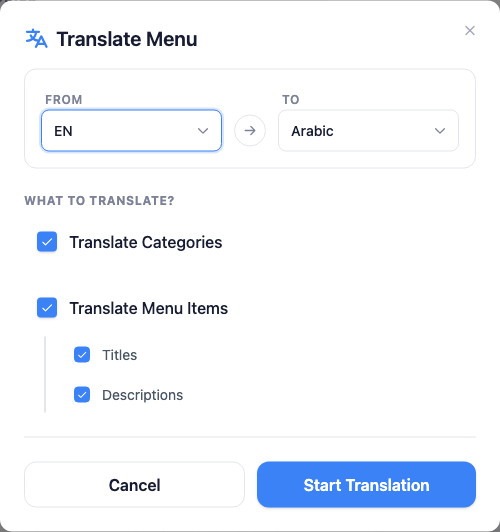
Auto-Translate All in the menu toolbar opens the Translate Menu dialog.
Set From and To (they must differ), tick Translate Categories and/or Translate Menu Items (and for items, whether to translate Titles, Descriptions, or both), then click Start Translation.
On the mobile app
Open the Lekro app and tap Menu in the bottom bar. A row of chips runs under the search box, and Translate All is the fifth of them, so the row usually needs a sideways scroll first.
The sheet is headed AI Translate. Set Translate from and Translate to, and note that each dropdown hides whatever the other has selected, so the two can’t end up the same. Under What to translate? are Category Names and Menu Items, with Titles and Descriptions nested under items. All four arrive ticked. Translate Now starts the run.
What you get at the end is a toast, not a screen: Translation completed! 34 items translated. If the allowance ran out partway it counts both halves instead: Success! 20 items translated. Note: 14 items were skipped due to insufficient credits.
Three things about this are worth knowing before you run it:
- It never overwrites. Only fields with no translation in the target language get filled. Text you’ve already written or corrected is safe, which means you can run it repeatedly as your menu grows.
- It skips modifier groups entirely. The dialog offers categories and menu items, and that’s genuinely all it covers. Modifier titles and choices stay manual.
- It can stop partway. Translation draws on a monthly AI allowance. If you run out mid-run, the job finishes what it can and tells you how many items were skipped.
Translation credits
Every AI translation consumes credit from a monthly allowance that resets each month:
| Plan | AI translations per month |
|---|---|
| Free | 100 |
| Premium | 2,000 |
| Pro | 10,000 |
One credit covers one field in one language. A dish with a name and a description translated into one language costs two, so a 60-dish menu with both fields runs to 120 credits: past the free allowance in a single pass. That’s the usual reason a first bulk run reports skipped items.
If you’re on the free plan with a large menu, translate categories first, then dishes in batches across months, or upgrade before the run. Starting a run with zero credits left is refused outright rather than done partially.
Neither the dashboard nor the app shows a running translation balance, the way the AI import and image tools show theirs. The message at the end of a run is where you find out you were short.
Keeping translations in sync
Note: Nothing re-translates itself. Edit a dish’s default-language text later and the other languages keep the old wording until you update them, either by hand or with AI Translate in the editor.
This is also why re-running Auto-Translate All won’t fix an outdated translation: the field already has a value, so bulk translation leaves it alone. Corrections are always a manual visit to that dish.
Writing translations that read well
- Adapt rather than translate literally. A phrase that sells a dish in English often needs restructuring, not word-swapping, to sell it in Arabic.
- Use the words your customers say. Everyday food vocabulary beats formal or literary phrasing on a menu.
- Leave established names alone. Shawarma and fattoush already have names people recognise; transliteration usually reads better than translation for imported dishes.
What’s next
With a multilingual menu in place, round out the rest of your site: reservations, your gallery, and reviews.